Manage the Seeed Xiao M0 and Wio Terminal boards
The Seeed SAMD platform includes two main lines of boards: the compact Xiao and the Wio Terminal.
Install the Seeed Xiao SAMD
To install the Seeed Xiao SAMD board,
-
Ensure the Arduino tools, CLI or IDE, are installed.
-
Ensure the
arduino-cli.yamlconfiguration file for Arduino-CLI or the Additional boards manager URLs for Arduino IDE includes
https://files.seeedstudio.com/arduino/package_seeeduino_boards_index.json```

+ Open a **Terminal** window.

+ Run

``` bash dollar
arduino-cli core install Seeeduino:samd
Install the Seeed Wio Terminal
The Wio Terminal includes two MCUs: a SAMD51 Cortex-M4 MCU for general purpose, and an Ameba RTL8720DN for Wifi and Bluetooth radio.
Install the SAMD platform for the Wio Terminal board
-
Ensure the Arduino tools, CLI or IDE, are installed.
-
Ensure the
arduino-cli.yamlconfiguration file for Arduino-CLI or the Additional boards manager URLs for Arduino IDE includes
https://files.seeedstudio.com/arduino/package_seeeduino_boards_index.json```
-
Open a Terminal window.
-
Run
$ | |
Install the firmware and libraries for WiFi and Bluetooth
The initial firmware of the RTL8720 radio of the Wio Terminal only provides WiFi capabilities.
To use WiFi and Bluetooth, the Wio Terminal requires an update of the firmware and the installation of dedicated libraries.
-
Please follow the procedure Update the Wireless Core Firmware .
-
Download and install the library Seeed_Arduino_rpcWiFi .
-
Download and install the library Seeed_Arduino_rpcBLE .
-
Download and install the library Seeed_Arduino_rpcUnified .
-
Download and install the library Seeed_Arduino_FreeRTOS .
The previous firmware based on AT-commands only provides WiFi capabilities.
-
Please follow the procedure RTL8720 AT-Command Structure Firmware .
-
Download and install the library Seeed_Arduino_atWiFi .
-
Download and install the library Seeed_Arduino_atWiFiClientSecure .
-
Download and install the library Seeed_Arduino_atUnified .
-
Download and install the library Seeed_Arduino_ESP-AT-library .
-
Download and install the library Seeed-Arduino-FreeRTOS .
-
Download and install the library Seeed_Arduino_mbedtls .
Install the Ameba RTL8720DN platform for the Wio Terminal board
Apart from the main SAMD51 MCU, the Seeed SAMD Wio Terminal board includes another MCU, RTL8720DN, in charge of WiFi and Bluetooth.
To install the RTL8720DN of the Wio Terminal board,
-
Ensure the Arduino tools, CLI or IDE, are installed.
-
Ensure the
arduino-cli.yamlconfiguration file for Arduino-CLI or the Additional boards manager URLs for Arduino IDE includes
https://files.seeedstudio.com/arduino/package_seeeduino_boards_index.json```
-
Open a Terminal window.
-
Run
$ | |
For more information on the installation process,
-
Please refer to the Update the Wireless Core Firmware - CLI Methods page on the Seeed Studio website.
-
Get the RTL8720 firmware command line utilities on the Seeed Studio website.
Using the RTL8720DN requires a utility running on the SAMD51 to provide a bridge between the RTL8720DN and the serial over USB.
-
Read How to Use Wio Terminal as RTL8720DN Dev Board on the Seeed Studio website.
-
Download the rtl8720_update or WioTerminal_USB2Serial_Burn8720 on the Seeed Studio website.
To install the Seeed Xiao nRF52840 board,
-
Ensure the Arduino tools, CLI or IDE, are installed.
-
Ensure the
arduino-cli.yamlconfiguration file for Arduino-CLI or the Additional boards manager URLs for Arduino IDE includes
https://files.seeedstudio.com/arduino/package_seeeduino_boards_index.json
-
Open a Terminal window.
-
Run
$ | |
- Select the boards and click on Install.
For more information on the installation process,
- Please refer to the How to Add Seeed Boards to Arduino IDE page on the Seeed Studio website.
Install the Seeed SAMD platform
The Seeed SAMD Xiao board includes the compact Xiao board and the IoT-enabled Wio Terminal.
To install the Seeed SAMD platform,
-
Download and install the supported versions of the Arduino IDE under the
/Applicationsfolder, as described in the section Install the Arduino platform. -
Launch it.
-
Define the path of the sketchbook folder in the menu Arduino > Preferences > Sketchbook location.
-
Avoid spaces in the name and path of the sketchbook folder.
-
Follow the procedure Install additional boards on Arduino.
-
Call the Boards Manager and check the Seeed SAMD boards are listed.

If the Seeed boards aren’t listed on the Boards Manager,
-
Open the Preferences.
-
Add the following URL on a separate line, as described in section Add URLs for new boards.
https://raw.githubusercontent.com/Seeed-Studio/Seeed_Platform/master/package_seeeduino_boards_index.json
- Select the boards and click on Install.
For more information on the installation process,
- Please refer to the How to Add Seeed Boards to Arduino IDE page on the Seeed Studio website.
The boards package does not include the utilities for the UF2 upload.
- Please install them from the Adafruit Feather nRF52 package.
Develop
Use the libraries for WiFi
Use the libraries for Bluetooth
- Edit the main
Makefileto list the required libraries.
USER_LIBS_LIST = ArduinoBLE
Use the libraries for SD
Check the tests
The test protocol includes building and linking, uploading and running a sketch on the boards using those versions of the IDEs and plug-ins. Boards packages are versioned but not dated.
| | Platform | IDE | Package | Comment
---- | ---- | ---- | ---- | ---- | ----
![]() | Seeeduino | Arduino 1.8 | AVR 1.3.0 | | For Seeed and Seeed Grove Beginner Kit
| | | | SAMD 1.8.0 | | For Xiao SAMD and Wio Terminal boards
| | | | Realtek 3.0.7 | | For RTL8720DN on Wio Terminal board
| Seeeduino | Arduino 1.8 | AVR 1.3.0 | | For Seeed and Seeed Grove Beginner Kit
| | | | SAMD 1.8.0 | | For Xiao SAMD and Wio Terminal boards
| | | | Realtek 3.0.7 | | For RTL8720DN on Wio Terminal board
Visit the official websites
| Seeeduino | |
|---|---|
| IDE | Arduino CLI or IDE |
| Website | https://www.seeedstudio.com |
| Download | http://wiki.seeed.cc/Seeed_Arduino_Boards |
| Wiki | http://wiki.seeed.cc/Seeeduino_v4.2/ |
| Xiao M0 | https://wiki.seeedstudio.com/Seeeduino-XIAO/ |
| Xiao RP2040 | https://wiki.seeedstudio.com/XIAO-RP2040/ |
| Xiao nRF52840 | https://wiki.seeedstudio.com/XIAO_BLE/ |
| Xiao ESP32C3 | https://wiki.seeedstudio.com/XIAO_ESP32C3_Getting_Started/ |
| Xiao ESP32S3 | https://wiki.seeedstudio.com/xiao_esp32s3_getting_started/ |
| Wio Terminal | https://wiki.seeedstudio.com/Wio-Terminal-Getting-Started/ |
| Forum | https://forum.seeedstudio.com/ |
Upload
Upload to Seeeduino SAMD boards
![]() The Seeeduino SAMD boards offer multiple options for uploading, two for the Wio Terminal and three for the Xiao M0 board.
The Seeeduino SAMD boards offer multiple options for uploading, two for the Wio Terminal and three for the Xiao M0 board.
The two first options rely on USB. They include the standard serial and the UF2 drag-and-drop procedures.
Unfortunately, the boards package supplied by Seeeduino doesn’t include the utilities required by UF2. They need to be installed from another board package.
For more information,
- Please refer to Upload to Adafruit Feather M0 and M4 boards using UF2.
The last option leverages the exposed pads SWCLK and SWDIO for SWD signal. It is designed specifically for debugging. It has been explored with the Xiao M0 board.
For more information,
- Please refer to Connect the Segger J-Link to the Seeeduino Xiao M0.
Upload to the RTL8720DN MCU of the Wio Terminal board
Using the RTL8720DN MCU requires to run a utility on the main SAMD51 MCU to provide a bridge between the RTL8720DN and the serial over USB.
For more information on the installation process,
-
Please refer to How to Use Wio Terminal as RTL8720DN Dev Board on the Seeed Studio website.
-
Download the rtl8720_update or WioTerminal_USB2Serial_Burn8720 on the Seeed Studio website.
Debug
Connect the Segger J-Link to the Seeeduino Xiao M0
The Seeeduino Xiao M0 exposes the SWD signals through SWCLK and SWDIO pads.
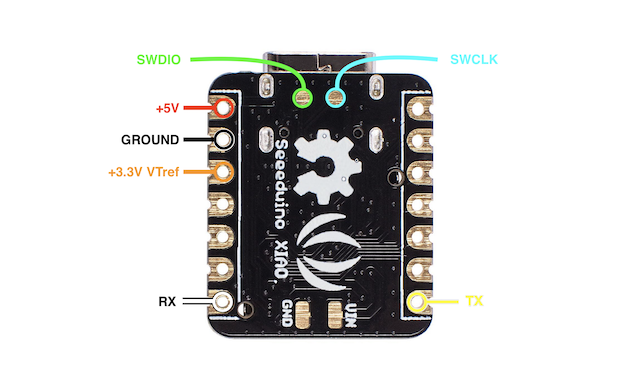
Cables and pins should be soldered to connect the Segger J-Link programmer-debugger.
For more information,
- Please refer to the Seeeduino Xiao wiki .
Use a Xiao M0 as DAP-Link debugger
The Xiao M0 can be used as a CMSIS-DAP probe to debug another Xiao M0.
For more information on using a Xiao M0 as a CMSIS-DAP probe,
- Please refer to Build a DAPLink Device using Seeed Studio XIAO SAMD21 .
Below is an example of the configuration of the tasks file tasks.json for debugging against the Xiao M0 with an addtional Xiao M0 as CMSIS-DAP debugger.
{
    "version": "0.2.0",
    "configurations": [
        {
            "type": "cortex-debug",
            "request": "launch",
            "name": "Xiao M0 CMSIS-DAP",
            "servertype": "openocd",
            "cwd": "${workspaceRoot}",
            "executable": "${workspaceRoot}/.builds/embeddedcomputing.elf",
            "interface": "swd",
            "gdbPath": "/usr/bin/gdb-multiarch",
            "device": "at91samdXX",
            "serverArgs": [
                "-s", "/usr/share/openocd/",
                "-c", "adapter speed 2000",
                "-f", "target/at91samdXX.cfg",
            ],
            "configFiles": [
                "interface/cmsis-dap.cfg"
            ],
            }
            // The extension uploads the executable to the MCU
            // "preLaunchTask": "Make"
        }
    ]
}